Boost Your NetSuite IQ
Tapping into NetSuite's Amazing Resources and Training Opportunities Can Boost Your NetSuite IQ, and your companies competitive advantage. We like to...
3 min read
David Smooha : Apr 17, 2015 7:00:00 AM

 Stale, old data is a common problem for NetSuite users. Sales and Purchase orders from years ago can remain open forever, skewing order reports and causing a headache for business owners. Although NetSuite is a powerful and easy to use tool, customers do not have access to the database and must rely on other tactics for the mass removal of stale data.
Before we move forward, a decision has to be made: do you want to delete your old orders or keep them in your system for historical reference and just have them removed from your open/pending sales reports?
We recommend keeping sales and purchase orders in your system, no matter how old they are. Deletion of these orders may affect inventory quantities on hand and skew a current inventory valuation. It will also help maintain insight into past sales activities and statistics.
To accomplish this, we mark orders “Closed.” Doing so sets the order’s status to Closed and prevent any further billing or fulfillment operations on the order. It also achieves the goal of removing the orders from your open orders reports. Data like the date, customer, and items are preserved for future reporting.
So how do we actually close our orders in bulk? Nobody will want to work their way through a list of orders, closing them one by one, and if there are open orders in the hundreds or thousands, it will not even be an option.
Closing orders in bulk will involve exporting order data into CSV format and then re-importing to NetSuite to update existing open sales and purchase orders.
Use a Saved Search to do the export and set the criteria for your search results as your company sees fit. For example, if you want to close sales orders prior to January 1, 2014, your criteria might look something like this: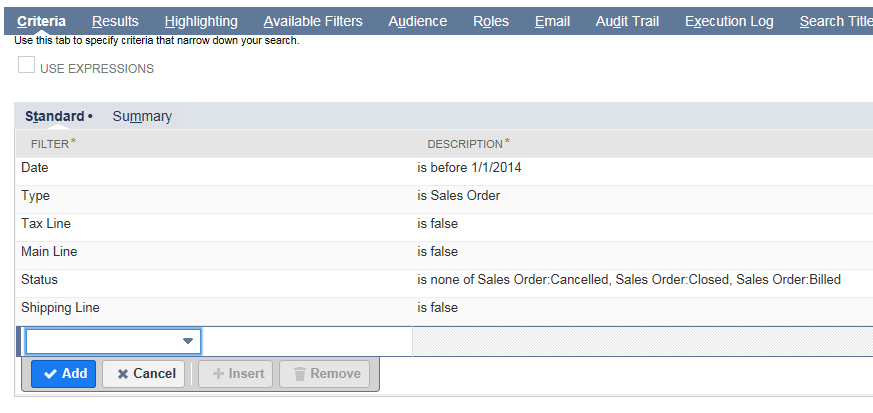
Notice that the Date filter is set to “before 1/1/2014” and the Type is set to “Sales Order.” (The type could also be “Purchase Order” and will need to be if you want to export records of that type.) Setting these criteria will ensure our results contain only sales orders prior to that date. We don’t want to close any open orders from 2014 or later as they may still be relevant to our sales process. Please have a thorough internal discussion with management and sales staff to determine the most appropriate filter date for closing orders in bulk.
We’ve set Main Line to be false since closing orders takes place at the detail level, not the main header level. Once all lines on an order are marked closed, the order’s status is set to closed automatically. Finally, Tax Line and Shipping Line must be false as well because we are only going to deal with items being sold or purchased.
Once the search criteria is set, you can begin choosing which columns will appear in the result data. You can add any order-related data you see fit but the columns Internal ID and Line ID are mandatory results. These two fields will tell NetSuite exactly which order and which line you’re editing (respectively) upon re-import. Think of these columns as the unique identifiers for each record.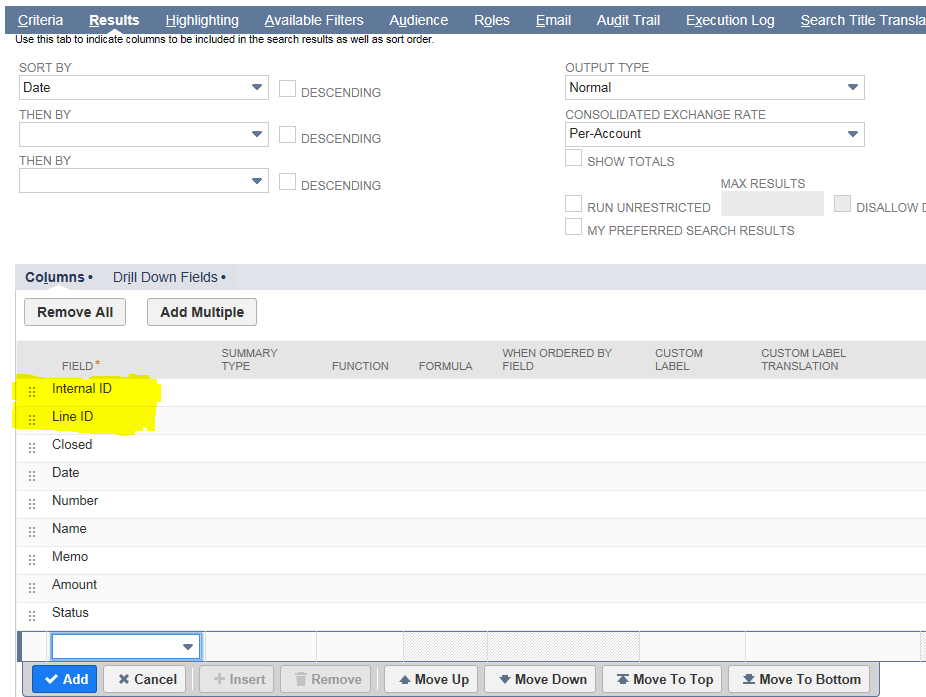
I’ve included Closed as a results column in my saved search but this is not necessary as I am assuming that this column will default to YES on re-import.
Once we have our results file exported to CSV, reviewed, and saved to our workstation, we can start setting up a CSV import to NetSuite.
Step 1: Scan & Upload CSV File
For each CSV import, a different record type will be required. For example, a CSV import for Sales Orders and a CSV import for Purchase orders.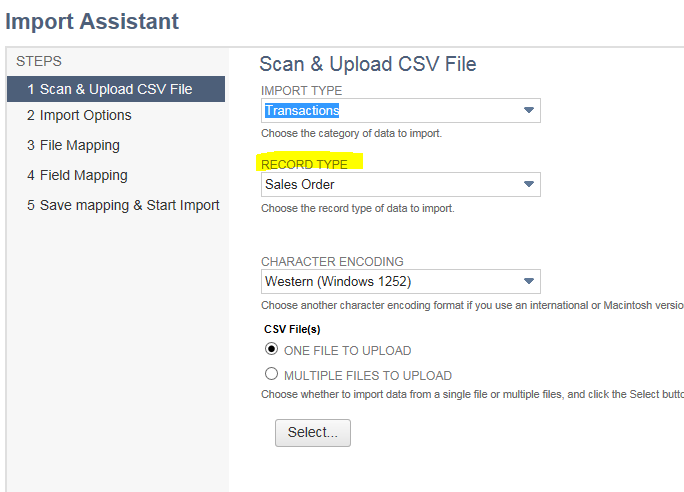
Step 2: Import Options
The import thing to note on this page is you’re selecting Update since we are updating existing records in NetSuite, not adding new records.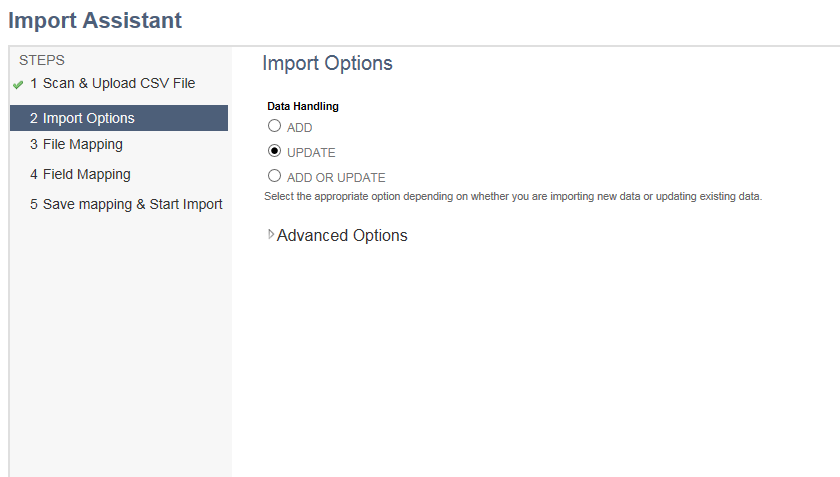
Step 3: Field Mapping
On mapping our import file to NetSuite’s available fields, we need only map the fields I mentioned earlier i.e. Internal ID, Line ID, and Closed. We set Closed to default to YES by clicking the pencil icon on the left-hand of the center column.
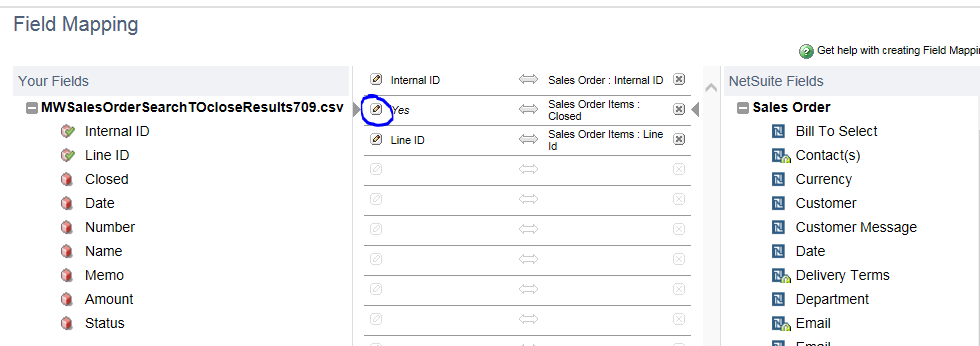
Finally, we have the option of saving this mapping for future use prior to running the import. View the results of your import job at Setup>Import/Export>View CSV Import Status. This process can be used for both sales orders and purchase orders with a quick change of the saved search criteria and import settings.
Should you need any advice or help with your upgrade, contact us today for a no-obligation consultation on how we can help your business benefit from NetSuite.

Tapping into NetSuite's Amazing Resources and Training Opportunities Can Boost Your NetSuite IQ, and your companies competitive advantage. We like to...
Distributors and manufacturers that use outdated distribution management software are losing out on their bottom line. According to a white paper...
E-commerce distributors can use analytics to their advantage, but it takes a deliberate approach to be successful.